
Fishing rod guides, often called “eyes,” direct the line along the rod, preventing tangles and ensuring smooth casting performance. While durable, they can break, necessitating replacement. Replacing them is straightforward with the right tools and knowledge, ensuring your gear remains in optimal condition for future fishing adventures.
What Are Fishing Rod Guides?
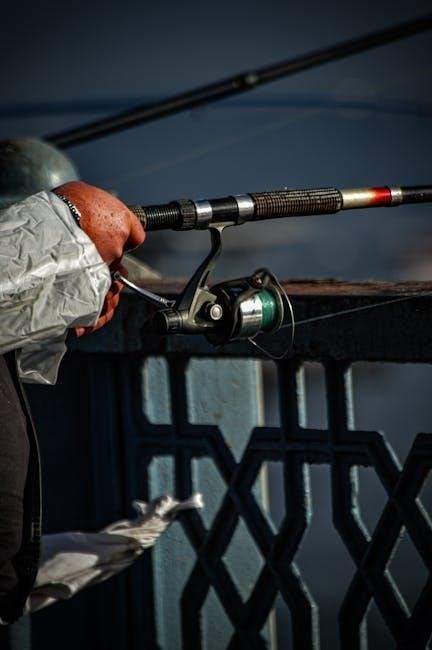
Fishing rod guides, often referred to as “eyes,” are circular or oval rings attached along the length of a fishing rod. Their primary function is to direct the fishing line smoothly from the reel to the tip of the rod, preventing tangles and ensuring even line distribution. Made from durable materials like ceramic, aluminum-oxide, or silicon carbide, these guides are designed to withstand wear and tear while maintaining precise line control. Properly aligned and spaced guides enhance casting accuracy, reduce friction, and improve overall fishing performance.
Importance of Guides for Fishing Rod Performance
Fishing rod guides play a crucial role in optimizing casting performance and line control. They reduce friction, preventing line wear and tangles, while ensuring smooth energy transfer during casts. Properly functioning guides enhance accuracy and distance, allowing for better presentation of lures or bait. Additionally, they help distribute stress evenly along the rod, reducing the risk of breakage when fighting larger fish. Well-maintained guides are essential for a seamless and enjoyable fishing experience, making their condition vital to overall rod efficiency and effectiveness.
Signs a Fishing Rod Guide Needs Replacement
Noticeable cracks or chips in the ceramic ring, a bent or warped frame, or a missing guide are clear indicators that replacement is necessary for optimal performance.
Cracks or Chips in the Ceramic Ring
Cracks or chips in the ceramic ring of a fishing rod guide are common signs of wear and tear. These damages can lead to line fray, tangles, and weakened performance. Inspect the guides regularly, especially after collisions or drops. Even small cracks can compromise the guide’s integrity, risking line breakage during a catch. Replacing a damaged ceramic ring ensures smooth line flow and prevents further issues. Use a magnifying glass for a thorough check, and address any damage promptly to maintain optimal casting efficiency and rod reliability.
Bent or Warped Guide Frame
A bent or warped guide frame disrupts proper line alignment, leading to tangles and uneven stress distribution. This damage often results from accidental impact or excessive force. A misshapen frame can cause the line to rub against the rod, creating friction and wear. If severely warped, the guide may fail to guide the line effectively, risking line breakage during casting or fighting fish. Prompt replacement is essential to restore smooth performance and prevent further complications while fishing.
Missing Guide
A missing guide leaves a gap in the line’s path along the rod, disrupting smooth casting and retrieval. Without it, the line may rub against the rod blank, causing friction and potential damage. A missing guide can lead to tangles, uneven stress distribution, and reduced casting accuracy. Prompt replacement is crucial to restore proper line flow and ensure consistent performance during fishing. Ignoring a missing guide can exacerbate issues, making the rod less effective and more prone to further damage over time.

Tools and Materials Needed for Replacement
Essential tools include a razor blade, cutting tool, and heat source. Materials needed are epoxy, thread, and replacement guides. These ensure a secure and durable installation.
Essential Tools
A razor blade or utility knife is needed to cut old epoxy and thread. A heat gun or hairdryer helps soften adhesive for safe removal. Pliers assist in gripping small guide parts, while a cutting tool, like wire cutters, trims excess material. A measuring tape ensures proper guide alignment, and a small clamp or tape holds the new guide in place during installation. These tools are crucial for a precise and effective guide replacement process.
Necessary Materials
Replacement guides, available in ceramic, aluminum, or titanium, are the primary material. Epoxy or thread adhesive is essential for securing the guide. Wrapping thread matches the rod’s finish, ensuring a seamless look. A small tube of super glue can reinforce bonds. Optional materials include UV-cured resin for added durability. These components ensure a sturdy and long-lasting repair, restoring your rod’s performance and reliability for future fishing trips.

A Step-by-Step Guide to Replacing Fishing Rod Guides
Replace damaged guides by removing the old, preparing the rod, and installing the new guide using a cutting tool, epoxy, and thread. Test the setup.
Step 1: Remove the Broken Guide
Begin by carefully removing the damaged guide to prepare the rod for the new one. Apply gentle heat to loosen the epoxy holding the guide in place. Using a razor blade or cutting tool, carefully slice through the old epoxy and thread wrapping. Avoid applying too much pressure, which could damage the rod blank. Once the adhesive is removed, gently twist the guide frame back and forth until it comes free from the rod. This step ensures a clean surface for installing the replacement guide.
Step 2: Prepare the Rod for the New Guide
After removing the broken guide, clean the rod blank thoroughly to ensure a smooth surface for the new guide. Use a fine-grit sandpaper or a cleaning solvent to remove any residual epoxy or debris. Once clean, apply a small amount of epoxy to the base of the new guide and carefully position it in the correct alignment. Ensure the guide is straight and properly spaced before securing it. Allow the epoxy to set slightly before moving on to the next step.
Step 3: Install the New Guide
Apply a thin layer of epoxy to the base of the new guide and carefully position it on the rod blank, ensuring proper alignment and spacing. Wrap the thread tightly around the guide foot, securing it firmly. Apply additional epoxy to seal the thread and ensure a strong bond. Use a small brush to smooth out any excess epoxy, ensuring it doesn’t interfere with the guide’s function. Allow the epoxy to cure completely before handling the rod, ensuring the guide is securely attached and ready for use.
Step 4: Secure and Test the Guide
Once the epoxy is fully cured, inspect the guide for proper alignment and stability. Apply a thin layer of finish or varnish to protect the thread and epoxy. Test the guide by running a line through it, ensuring smooth movement without obstruction. Check for any wobbling or looseness, and make adjustments if necessary. Finally, perform a stress test by gently bending the rod to ensure the guide remains securely attached and functional under pressure.
Optional Upgrades and Enhancements
Upgrading to high-quality guide materials enhances performance and durability. Anglers can also adjust guide spacing for better line flow and improved casting efficiency, optimizing their fishing experience.
Upgrading to High-Quality Guide Materials
Upgrading to high-quality guide materials, such as titanium or nano-ceramic, enhances durability and performance. These materials reduce friction, improving line flow and casting distance. Lightweight yet strong, they minimize wear on the fishing line and rod. Professional anglers often opt for these upgrades to ensure reliability in demanding conditions. By investing in premium guides, anglers can achieve smoother casts, better line control, and extended gear longevity, making every fishing trip more enjoyable and productive.
Adding Guide Spacing for Improved Performance
Proper guide spacing ensures even stress distribution and improved casting performance. By strategically positioning guides along the rod, anglers can enhance line control, reduce tangles, and increase casting distance. Optimal spacing depends on the rod’s length and intended use, with closer guides near the tip for sensitivity and wider spacing toward the base for strength. Adjusting guide placement can significantly impact the rod’s balance and flexibility, making it more responsive and effective in various fishing conditions.

Maintenance Tips to Prevent Future Damage
Regularly inspect guides for cracks or wear, clean them to prevent debris buildup, and store rods in protective cases to avoid accidental damage and extend guide lifespan.
Regular Inspection of Guides
Regularly examining your fishing rod guides is crucial for maintaining performance and preventing unexpected issues. Inspect each guide for cracks, chips, or wear in the ceramic rings and frame. Check for any signs of loose adhesion where the guide meets the rod blank. Use a magnifying glass for a detailed look, especially after trips or storage. Addressing minor damages early can prevent major repairs later, ensuring your gear remains reliable for every fishing outing.
Proper Storage and Handling of the Fishing Rod
Proper storage and handling are key to maintaining your fishing rod’s performance and longevity. Always store the rod in a protective case or sleeve to prevent scratches and impacts. Avoid exposing the rod to extreme temperatures or direct sunlight for prolonged periods. Handle the rod with care, especially near the guides and tip, as rough handling can lead to damage. Store the rod in a dry place, away from chemicals, to prevent corrosion or weakening of the guides and components.

Common Mistakes to Avoid During Replacement
Step-by-Step Guide to Replacing a Fishing Rod Guide
Assess the Damage: Inspect the guide for cracks, chips, or bends. Determine if a full replacement is necessary or if a minor repair can suffice.
Gather Tools and Materials: Collect a new guide, adhesive or epoxy, thread or wrapping material, and any specific tools needed for removal and installation.
Remove the Damaged Guide: Carefully remove the broken guide using a heat source to soften the adhesive, taking care not to damage the rod blank.
Prepare the Rod: Clean and prepare the area where the new guide will be installed, ensuring it is dry and free of debris.
Install the New Guide: Apply the adhesive or epoxy to the new guide and attach it to the rod, ensuring proper alignment for optimal performance.
Secure the Guide: Use thread or wrapping material to secure the guide in place, following proper wrapping techniques to ensure durability.
Allow Adhesive to Cure: Let the adhesive or epoxy cure completely before using the rod to ensure a strong bond.
Test the Guide: Inspect the guide for proper alignment and security. Test the rod by casting to ensure smooth performance and no issues with the line.
Important Considerations
– Avoid Common Mistakes: Be cautious not to apply too much heat, which can damage the rod blank. Use the correct adhesive or epoxy to ensure the guide is securely attached.
– Maintenance and Inspection: Regularly inspect the guides for any signs of wear or damage. Properly store and handle the rod to prevent future issues.
– Upgrades and Enhancements: Consider upgrading to higher-quality guides or adjusting guide spacing for improved casting performance.
– Troubleshooting: If the guide becomes loose or misaligned after installation, refer to troubleshooting steps to correct the issue.
– Cost and Professional Help: Weigh the cost of materials against the option of seeking professional help, especially if unsure of your DIY skills.
By following these steps and considerations, you can successfully replace a fishing rod guide, ensuring your rod performs optimally for future fishing adventures.
Incorrect Guide Alignment
Incorrect guide alignment can severely impact casting performance and stress distribution. Misaligned guides cause uneven line flow, leading to tangles and reduced accuracy. To prevent this, ensure proper positioning during installation. Align the guide feet parallel to the rod blank and evenly spaced for consistent performance. Use a guide spacing chart or consult a professional if unsure. Proper alignment ensures smooth casting and extends the rod’s lifespan, avoiding unnecessary repairs and maintaining optimal functionality for your fishing adventures.
Using the Wrong Adhesive or Epoxy
Using the wrong adhesive or epoxy when replacing fishing rod guides can lead to loose or wobbly guides, compromising performance. The epoxy must bond securely with both the rod blank and the guide frame. Using a low-quality or incorrect adhesive can result in the guide coming loose over time, especially under stress. Always use a high-strength, marine-grade epoxy designed for rod repair to ensure durability and reliability, preventing future issues and maintaining the rod’s integrity during use.

Troubleshooting Post-Replacement Issues
After replacing guides, issues like misaligned guides or loose fittings may arise. Check alignment to ensure proper line flow and casting efficiency. Verify epoxy curing for secure bonds.
Addressing Misaligned Guides
Misaligned guides can disrupt line flow and casting accuracy. To fix, gently loosen the epoxy or thread wrapping around the guide. Use a guide spacing chart or calipers to ensure proper alignment with adjacent guides. Once correctly positioned, secure the guide firmly. Double-check alignment using a small level or by visually inspecting the straight path of the line. Proper alignment ensures even stress distribution and optimal casting performance, preventing future damage or tangles during use.
Fixing Loose or Wobbly Guides
Loose or wobbly guides can cause line slippage and reduce casting efficiency. To fix, apply a small amount of marine-grade epoxy or thread wrapping adhesive to the base of the guide. Allow it to cure fully before testing. For added stability, wrap a thin layer of thread around the guide foot and seal it with epoxy. This ensures a secure fit and prevents future movement. Properly securing guides is essential for maintaining consistent line control and overall rod performance during fishing trips.

Cost Considerations and DIY vs. Professional Repair
Replacement guides and materials are affordable, with DIY repair saving money. However, complex issues or high-end rods may require professional expertise, increasing costs but ensuring quality results.
Cost of Replacement Guides and Materials
The cost of replacement guides and materials varies, with individual guides ranging from $3 to $15, depending on quality and brand. A full set of guides can cost $20 to $50. Additional materials like epoxy, thread, and adhesive are typically inexpensive, around $10 to $20. These costs are relatively low, making DIY repairs a cost-effective option for anglers. However, for high-end rods or complex repairs, professional services may be worth the extra expense for optimal results and durability.
When to Seek Professional Help
While many guide replacements are DIY-friendly, seek professional help for complex repairs or high-end rods. If the damage is extensive, or you lack confidence in your skills, a professional can ensure precise alignment and durability. Expert rod builders have the tools and expertise to handle intricate wraps, specialized materials, and delicate rod blanks, ensuring optimal performance and longevity for your fishing gear.
Safety Tips for the Replacement Process
Always wear protective gloves and eyewear when handling sharp tools or adhesives. Use caution with heat sources to avoid damaging the rod blank or causing burns.
Working with Heat and Adhesives Safely
When using heat guns or adhesives, ensure proper ventilation to avoid inhaling fumes. Wear protective gloves and eyewear to prevent accidents. Apply heat gently to avoid damaging the rod blank or surrounding finish. Use a thermometer to monitor temperature and prevent overheating. Keep a fire extinguisher nearby and work on a heat-resistant surface. Always follow the manufacturer’s instructions for adhesives and epoxy to ensure safe and effective application.
Never leave heat guns unattended, and store adhesives out of reach of children. Maintain a clean workspace to minimize risks and ensure precise results. Safety precautions protect both you and your equipment, ensuring a successful guide replacement.
Avoiding Damage to the Rod Blank
When replacing guides, avoid applying excessive heat that could damage the rod blank. Use a low-temperature heat gun and monitor the temperature to prevent warping or discoloration. Never apply direct heat for extended periods, as this can weaken the blank’s material. Always handle the rod with care to avoid bending or scratching the surface. Use protective pads or cloths when clamping or holding the rod to ensure no direct pressure damages the blank.
Keep sharp tools away from the blank to prevent accidental nicks or gouges. Maintain a clean, stable workspace to minimize the risk of accidental damage during the replacement process. Protecting the rod blank ensures the longevity and performance of your fishing rod.
Proper guide replacement and maintenance ensure optimal fishing rod performance, preventing issues and extending gear lifespan. Regular care and timely repairs keep your equipment ready for every adventure.
Final Thoughts on Guide Replacement
Replacing fishing rod guides is a cost-effective and manageable process that ensures optimal performance. By addressing damaged or worn-out guides, anglers can maintain precise line control and casting accuracy. Regular inspection and timely repairs prevent further damage, extending the lifespan of the rod. With the right tools and knowledge, anglers can confidently restore their gear, ensuring every fishing trip remains enjoyable and successful. Proper guide maintenance is a simple yet crucial step in preserving the reliability and effectiveness of your fishing equipment.
Encouragement to Practice and Maintain Gear
Regular maintenance and practice are crucial for ensuring your fishing gear performs at its best. By inspecting and caring for your rod guides, you can prevent unexpected issues during fishing trips. Taking the time to learn and master guide replacement skills not only saves money but also enhances your overall fishing experience. Stay proactive with gear upkeep, and you’ll enjoy reliable performance and countless successful angling adventures. Remember, maintaining your equipment is an investment in your passion for fishing.


Be the first to reply